Showing posts with label main dish. Show all posts

Monday, July 21, 2014

roasted shrimp and orzo


Happy Monday, y'all! Best news ever -- our AC is fixed! We were blessed with incredible weather -- 70 degrees in Dallas in JULY -- this weekend, but as the temp is supposed to climb back up to 100 this week, I couldn't be more thankful for some COOL AIR!

The return of hot weather calls for easy cooking and fresh, colorful meals. This roasted shrimp and orzo salad from (who else?) Ina fits the bill perfectly. It's got great salty flavor from the chunks of feta and perfect crunch from cucumbers and red onion. Lots of fresh herbs in the mix because... well, you know.

This is the perfect dish for entertaining because the longer it sits, the better it is! Let's have some friends over, serve this up in big bowls, and celebrate summer!

Roasted Shrimp and Orzo (from Ina Garten)
serves 6

you'll need:
kosher salt & freshly ground black pepper
olive oil
3/4 lb. orzo 
juice of 3 lemons
2 lbs. peeled and deveined shrimp
1 cup minced scallions
1 cup chopped fresh dill
1 cup chopped fresh Italian parsley
1 English cucumber, seeded and diced
1/2 red onion, diced
3/4 lb. feta cheese, diced

Preheat the oven to 400 degrees F.

Bring a large pot of water to a boil. Salt well, then add the orzo and cook according to package directions. Drain and pour into a large bowl. Pour over the lemon juice, 1/2 cup olive oil, 1 teaspoon salt and 1/2 teaspoon pepper. Stir well and set aside.

While the pasta is cooking, place the shrimp on a sheet pan. Toss with a bit of olive oil, salt, and pepper. Roast the shrimp in a single layer for 5-6 minutes, until the shrimp are just cooked through and pink.

Add the shrimp to the orzo along with the scallions, dill, parsley, cucumber, and onion. Taste for seasoning and add salt and pepper as desired. Carefully fold in the feta. Keep at room temperature for 1 hour before serving to allow the flavors to blend, or refrigerate up to overnight. (If refrigerating, bring back to room temperature before serving.)

Follow on Bloglovin

Wednesday, July 16, 2014

chopped bbq chicken salad with honey mustard vinaigrette


Hi friends! Apologies for the inconsistent, sparse posting lately... since we got back from our vacation last week, our air conditioning went out and we've basically been nomads. Our house is literally mid-90s inside. What in the world. But! The weather's cooling down a bit and it's supposed to get fixed by the end of the week, so... yeah. Fingers crossed for that!

Since turning on the oven is 100% not an option at this point, this is the only type of meal that is remotely acceptable to make. I used rotisserie chicken because... see above paragraph. Everything else is just chopping and tossing. It's easy and delicious!

Now, if you'll excuse me, I'm going to go stick my head in the freezer. 

Chopped BBQ Chicken Salad with Honey Mustard Vinaigrette (adapted from How Sweet Eats)
serves 4

for the salad, you'll need:
1 lb. cooked chicken breasts, chopped
1/2 cup BBQ sauce
1 large head of romaine, chopped
2 ears sweet corn, kernels removed
1 red bell pepper, seeded and diced
4 slices bacon, cooked and crumbled
1/2 cup pepper jack cheese, shredded
a handful of croutons
1 avocado, pitted and chopped
lime wedges, for serving

for the vinaigrette, you'll need:
2 tablespoons honey
1 1/2 tablespoons grainy mustard
1/4 teaspoon garlic powder
1/4 teaspoon kosher salt
1/4 teaspoon freshly ground black pepper
dash of cayenne
1/4 cup red wine vinegar
2/3 cup olive oil

First, make the vinaigrette by combining all of the ingredients in a jar. Close the lid, shake it like crazy, and set aside. 

In a medium bowl, pour the BBQ sauce over the chicken breasts and stir to coat. In a separate large bowl, toss the romaine, corn, bell pepper, bacon, cheese, and croutons to combine. Dress with the desired amount of dressing and toss again. Fold in the avocado and chicken. Serve with lime wedges and additional dressing, if desired.

Follow on Bloglovin

Monday, June 30, 2014

whole wheat corn zucchini pancakes


How I'm spending my last day of June:

-as many hours by the pool as possible
-while finishing this book
-and eating these
-getting my nails done-did
-furiously doing laundry/packing for our vacation (!!)
-finishing up the last of these savory, cheesy, summery pancakes.

What about you?!

Whole Wheat Corn Zucchini Pancakes

yields a dozen pancakes

you'll need:
4 eggs
3 tablespoons olive oil, plus extra for frying
1 teaspoon kosher salt
1/2 teaspoon red pepper flakes
1/2 teaspoon dried basil
1/2 teaspoon dried dill
1 large zucchini, grated
3 cups fresh corn kernels (about 4 ears)
1/2 cup freshly grated pecorino romano
1 1/2 cups whole wheat flour

Preheat oven to 200 degrees F.

Whisk together eggs, 3 tablespoons olive oil, salt, red pepper, basil, and dill in a large bowl. Stir in the grated zucchini, corn kernels, and pecorino. Add the flour and stir until everything is well-combined.

Heat a bit of olive oil in a large skillet over medium heat. Use a 1/4 cup measuring cup to scoop batter onto the skillet (I did 3 or 4 at a time). Cook 3-4 minutes per side. Transfer the cooked pancakes to a baking sheet and keep in the oven so that they stay warm until serving. Repeat with remaining batter.

Serve warm with a squeeze of lemon on top - hot sauce and/or sour cream are also delicious!

Follow on Bloglovin

Monday, June 9, 2014

toasted pecan & blueberry orzo salad


Let's kick off the summer right!

This salad is my new go-to... I'm kind of ridiculously in love with it. So many good flavors going on, from the salty capers and the sweet blueberries! The toasted pecans add a little texture and nutty goodness. The parmesan and the mustardy dressing makes this completely and utterly divine. Ah! So good!

This is the perfect dish to bring to a summer get-together, but it would do just as well as your lunch for the week. Let's get into it!

Toasted Pecan & Blueberry Orzo Salad (adapted from Joy the Baker)
serves 2-4

you'll need:
1 cup orzo
3 tablespoons olive oil
juice of 1 lemon
1 tablespoon whole grain mustard
kosher salt and freshly ground black pepper
1 tablespoon capers
1/2 cup toasted pecans, roughly chopped
1/2 cup fresh blueberries
1/4 cup parmesan, grated
1/4 cup chopped fresh basil

Bring a large pot of water to a boil. Salt generously, then add orzo and cook according to package directions. When done, drain and rinse well in cold water.

Meanwhile, whisk together olive oil, lemon juice, and mustard for the dressing. Taste and add salt and pepper to taste.

Add dressing to the cooked orzo and stir to combine well. Stir in the capers, pecans, blueberries, parmesan, and basil. Chill until ready to serve.

Follow on Bloglovin

Wednesday, May 14, 2014

spicy baked falafel


Y'all know how much I love falafel. I ate it more times than is remotely acceptable on our trip to Paris last summer, and ever since then I get it whenever possible. I hesitated to make it at home because 1) my fear of frying and 2) my fear that I wouldn't be able to replicate its goodness.

But! I saw this baked recipe that sounded fabulous, so I had to go ahead and try it out. And y'all -- it was soooo good. The spices are just perfect, it couldn't be easier to make, and it totally exceeded my expectations.

Serve it on its own, over a salad, in a pita... try it out!

Spicy Baked Falafel (adapted from How Sweet Eats)
serves 2-4

you'll need:
2 (14 oz.) cans chickpeas, drained and rinsed
4 garlic cloves, chopped
4 green onions, sliced
1 egg
juice of 1 lemon
1/2 cup chopped Italian parsley, plus more for serving
1 tablespoon olive oil
1/2 teaspoon salt
1/4 teaspoon freshly ground black pepper
1/2 teaspoon cumin
1/2 teaspoon smoked paprika
1/4 teaspoon red pepper flakes, plus more for serving
dash of cayenne pepper
1/4 cup all-purpose flour
tzatziki, for serving

Preheat oven to 400 degrees F.

Combine all ingredients (except tzatziki) in a food processor or blender. Pulse until crumbly and combined.

Scoop about 2 tablespoons worth and form a small patty with your hands. Place falafel on a greased baking sheet and bake for 20-25 minutes, until slightly crisp on top. Serve with tzatziki sprinkled with parsley and red pepper flakes.

You can also pan-fry these if you'd like! Just heat a bit of olive oil in a skillet and cook each patty until browned on both sides.

Follow on Bloglovin

Monday, April 28, 2014

tomato artichoke penne


I'm officially in the last month of school for this year (what?!), which means I am running around like a crazy person pretty much at all times. It's just what we do at the end of school -- final projects, field trips, programs... it's all happening. It's fun but exhausting!

During this super busy time of year, dinners like this are total lifesavers. I saw this recipe a while ago on Shutterbean and knew just from reading the ingredient list that I would LOVE it. And it turned out even better than I was expecting! It has awesome textures and flavors and - best of all for this time of year - the leftovers are maybe even better, which means I can pack it for my lunches all week long! Like I said... life. saver.

Tomato Artichoke Penne (slightly adapted from Shutterbean)
serves 4-6

you'll need:
1/3 cup pine nuts
1 tablespoon olive oil
1 yellow onion, chopped
5 cloves garlic, minced
1 (28 oz.) can diced tomatoes
1 (12 oz.) jar marinated artichokes, drained and roughly chopped
1 tablespoon dried basil
10 oz. brown rice penne pasta
salt & pepper to taste
1/2 cup shredded parmesan cheese, plus more for serving

In a medium saucepan, toast pine nuts over medium heat for about 3 minutes, until fragrant and lightly browned. Remove from pan and set aside.

Wipe saucepan clean, then add olive oil to the pan. Saute onion over medium-high heat for 3-4 minutes, until translucent. Add garlic and saute for 1 more minute. Add the tomatoes, artichokes, and basil and stir. Continue to cook over medium-high heat for about 20 minutes, until sauce is reduced and thick.

While sauce is cooking, bring a large pot of water to a boil. Salt well, then add pasta and cook according to the package directions.

When pasta is done cooking and sauce is ready, add the pasta and pine nuts to the sauce and stir. Stir in 1/2 cup parmesan. Taste and add seasoning as desired.

Serve in bowls with more parmesan on top. YUM!

Follow on Bloglovin

Saturday, April 19, 2014

ham & brussels sprouts naan pizza


Hey there! Thought I'd throw in a little weekend recipe for those of you who are already thinking about what you're going to do with leftover Easter ham.

Wait, do you have an Easter ham? We don't... I don't know if we ever have? We've always been non-traditional when it comes to holiday food. This year we're having this salad alongside this pasta. Of course there will be garlic bread. I'm making these for snacking, and we're having my mom's incredible coconut pie for dessert. YUM.

But back to ham! Since most of you will have some leftover, please please please try this pizza. It is INSANE how good it is! I had a similar pizza in Austin last month and couldn't wait to recreate it at home. The sweet balsamic and the roasty brussels sprouts are perfection.

This is just as a leftover meal should be: quick, easy, delicious. Done!

Ham & Brussels Sprouts Naan Pizza
makes 4 pizzas

you'll need:
4 naan breads
1 cup shredded mozzarella
1/4 lb. ham, diced
1 teaspoon olive oil
1 teaspoon balsamic vinegar, plus more for drizzling
1 cup shredded brussels sprouts
grated parmesan, for serving

Preheat oven to 400 degrees F.

Line a large baking sheet with parchment paper. Place breads on the baking sheet. Divide the mozzarella between each one, then top with ham. In a small bowl, toss the brussels sprouts with olive oil and balsamic vinegar. Divide brussels sprouts evenly over each pizza.

Bake pizzas for 15 minutes, until cheese is bubbly. To serve, drizzle with balsamic vinegar and sprinkle parmesan on top.

Follow on Bloglovin

Monday, April 14, 2014

pistachio pesto pasta with lamb


Springtime food might be my favorite. I love all the fresh, bright flavors and the gorgeous, vibrant colors. It just makes me happy!

This dish combines all of those things into one crazy good pasta dish. The pesto is lemony and minty and good enough to eat by the spoonful. Don't worry, you'll have some extra leftover to do just that.

Lamb turns this into a hearty spring dinner, but the pasta would also be a lovely vegetarian dish on its own. Either way, y'all are going to love this one!

Pistachio Pesto Pasta with Lamb (adapted from Running to the Kitchen)
serves 4

you'll need:
1 lb. fettuccine
1 lb. ground lamb
2 cups baby spinach
1/4 cup mint leaves
1/3 cup alfalfa sprouts
2 garlic cloves
juice of 1 lemon
1/4 cup shelled pistachios
1/2 cup grated pecorino
1/4 teaspoon kosher salt
freshly ground black pepper
3 tablespoons olive oil

Bring a large pot of water to a boil. Salt generously, then add the pasta and cook to al dente according to the package directions. Reserve 1 cup of pasta water before draining.

Meanwhile, heat a large skillet over medium-high heat. Add the lamb and cook until completely done, breaking up the meat as it cooks. Add salt and pepper to taste. Transfer the cooked lamb to a paper towel-lined plate to drain excess fat.

While the pasta and lamb are cooking, make the pesto: in a food processor or blender, blend spinach, mint, sprouts, garlic, lemon juice, pistachios, pecorino, salt, and olive oil until smooth. Taste and adjust seasoning as desired.

Combine the cooked pasta, lamb, and as much pesto as you like (I used about half). You may want to add a bit of the reserved pasta water to thin it out. Garnish each bowl with more sprouts, pistachios, and pecorino. So good, y'all!

Follow on Bloglovin

Monday, March 31, 2014

farro risotto with kale and sundried tomatoes


Mondays are better with a meal like this one. While at the end of a long Monday I'm tempted to call our favorite Thai takeout, I always feel so much better if I make a tasty, healthy, hearty dinner like this one. Not to mention the therapy that is stirring a pot of risotto. The best.

I love the bright, springy flavors in this risotto. It's bound to make Monday a lovely day!

Farro Risotto with Kale and Sundried Tomatoes (adapted from Foxes Loves Lemons)
serves 2-4

you'll need:
5 cups vegetable broth
2 tablespoons olive oil
1/2 onion, diced
3 garlic cloves, minced
1/4 teaspoon kosher salt
1/4 teaspoon red pepper flakes
1/4 teaspoon freshly ground black pepper
1 cup farro
1/2 cup dry white wine
1/2 bunch kale, stems removed and chopped
1/4 cup sundried tomatoes, chopped and excess oil blotted
1/2 cup grated Pecorino Romano, plus more for servings
1 tablespoon Worcestershire
fresh lemon zest, for serving

In a medium covered pot, heat broth to a simmer over medium heat. Once simmering, turn heat to low.

In a large skillet, heat olive oil over medium heat. Add onion, salt, red pepper, and pepper. Cook 4-5 minutes, stirring frequently. Add farro and toast for 1 minute, stirring constantly. Stir in wine and cook for 1-2 minutes, until wine is absorbed.

Add 1/2 cup of the warm broth and cook until almost absorbed, stirring frequently. Continue adding broth 1/2 cup at a time, stirring, for 45 minutes, or until the farro is tender. Stir in kale, sundried tomatoes, Pecorino, and Worcestershire. Stir until the kale is wilted, adding more broth if necessary. Top with a bit more Pecorino and lemon zest and serve immediately!
Follow on Bloglovin

Monday, March 3, 2014

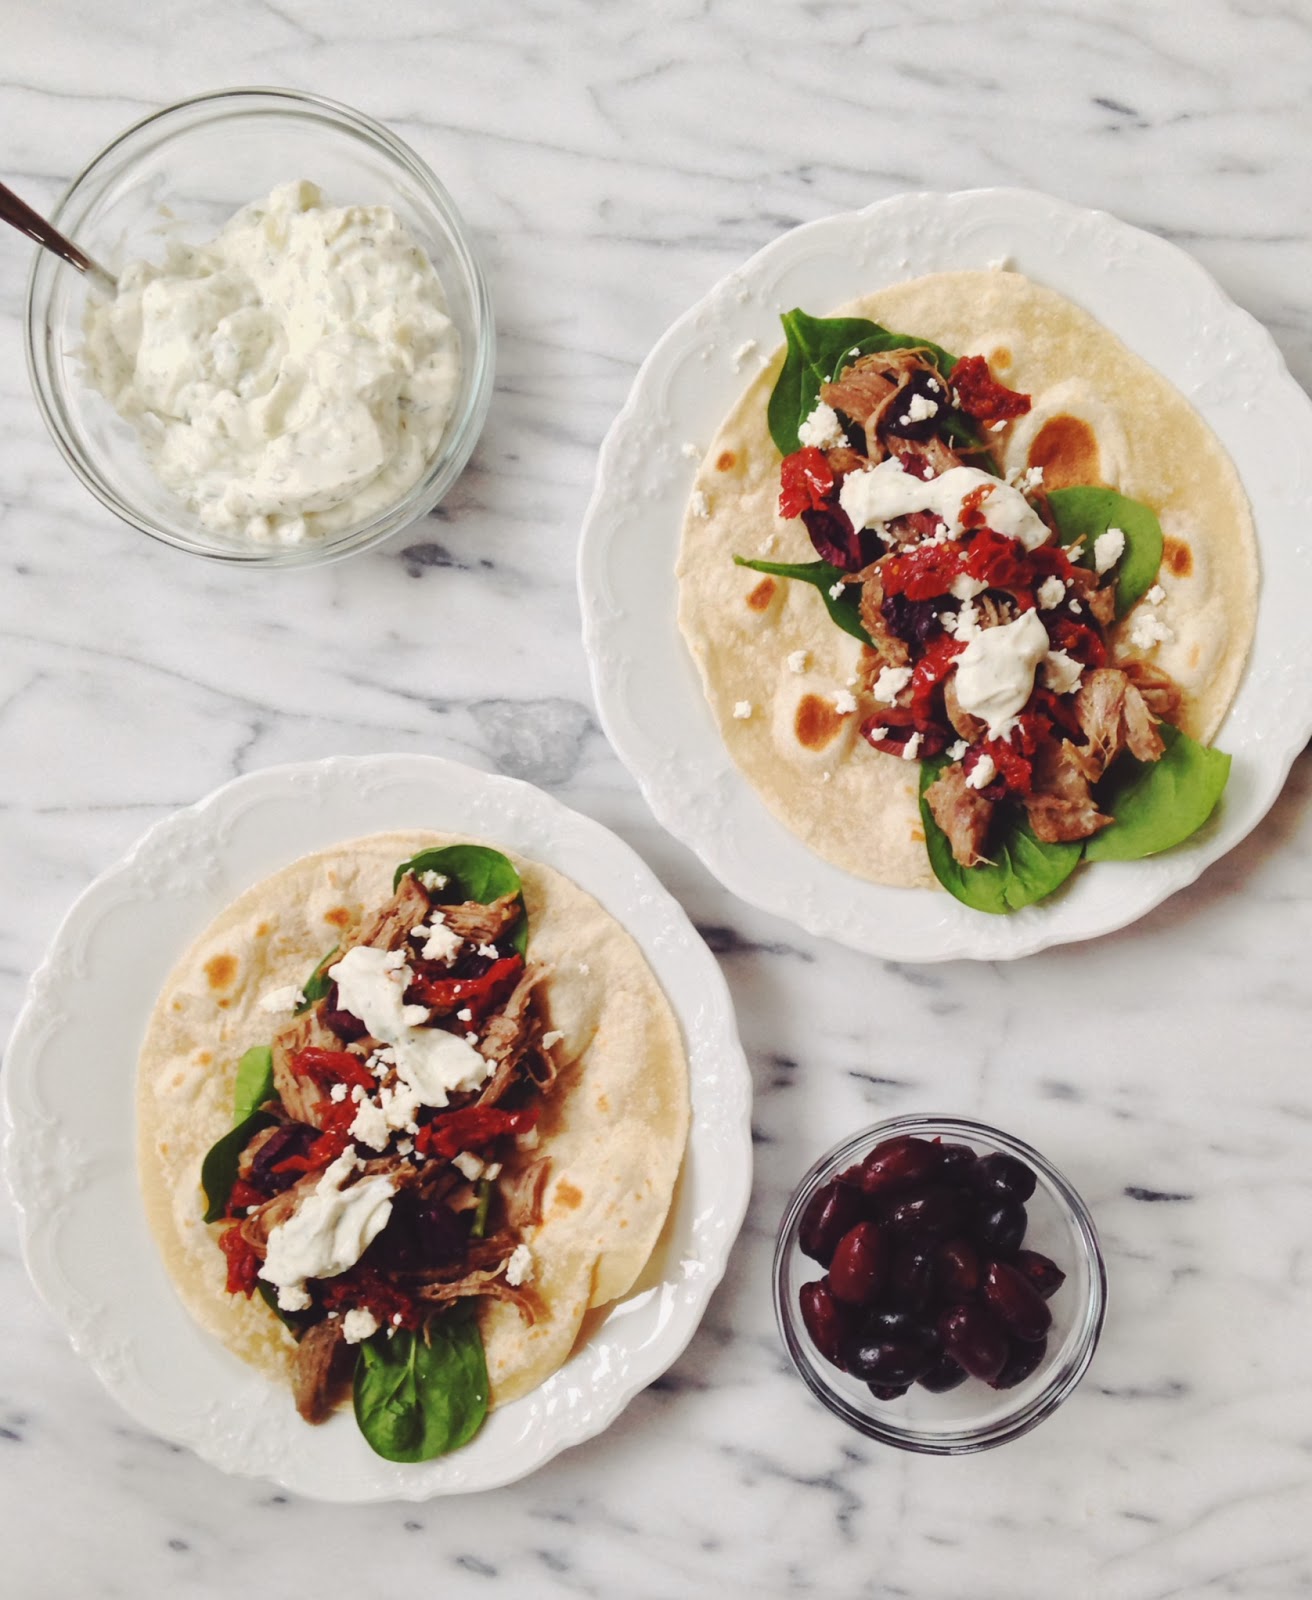
slow cooker greek lamb tacos


Oh, Texas. I was so optimistic in my last post about spring weather, and you had me going for a bit there. Saturday, 75 and sunny. Sunday, ice storm. WHAT.

A surprise ice day calls for a warm, hearty meal like this. The slow cooker does all the work here, and gives you the most tender, tasty lamb ever. Pile some warm tortillas with the shredded meat and some bright Greek flavors, and you have heaven in taco form. It's a thing.

Slow Cooker Greek Lamb Tacos (adapted from Foodie with Family)
serves 6

for the lamb, you'll need:
4 lb. boneless leg of lamb
zest and juice of 1 lemon
8 garlic cloves, peeled
olive oil
3 tablespoons dried oregano
kosher salt and freshly ground black pepper

for the tacos, you'll need:
flour tortillas
baby spinach
sundried tomatoes, chopped and excess oil blotted
kalamata olives, pitted and halved
tzatziki
crumbled feta

Rub the lamb with olive oil, then sprinkle with oregano, salt, and pepper. Place it in your slow cooker. Add the lemon juice and zest and scatter the garlic cloves over the lamb. Cover and cook on high for 4-5 hours. When lamb is done, use two forks to shred the meat.

To assemble tacos, pile warm flour tortillas with baby spinach, lamb, olives, sundried tomatoes, and feta. Top with a dollop of tzatziki and a squeeze of fresh lemon juice. YUM YUM.

Follow on Bloglovin

Wednesday, February 26, 2014

kohlrabi carrot fritters with avocado yogurt


Last week we had a bunch of kohlrabi in our CSA share, which made me happy because I love getting surprised with veggies I don't normally seek out. I'd never eaten it any other way except as a raw salad, and I know my husband well enough to know he probably wouldn't be down with that for lunch. No big. He loves any and every veggie in fritter form (who doesn't?).

These were so light, crispy, and flavorful! The kicker is, of course, that yummy avocado yogurt on top. The recipe below will give you some extra for another use... or eating with a spoon.

Kohlrabi Carrot Fritters with Avocado Yogurt (slightly adapted from A Couple Cooks)
makes 4 large fritters

you'll need:
2 kohlrabi
1 carrot
1 egg
1/4 teaspoon kosher salt
1/4 teaspoon cayenne pepper
1-2 tablespoons vegetable oil
1/2 avocado
1/4 cup plain Greek yogurt
juice of 1/2 lemon
1/4 teaspoon kosher salt
1 scallion, sliced, for garnish

Cut the leaves off of the kohlrabi and peel the bulb. Peel the carrot. Use a food processor or grater to shred the vegetables. Squeeze in a tea cloth or paper towel to get rid of excess moisture. In a large bowl, stir vegetables, egg, salt, and cayenne together.

Heat 1 tablespoon of vegetable oil in a large skillet, swirling to coat, over medium-high heat. Use your hands to form balls of the fritter mixture and place in the skillet. Make sure not to crowd them (I fried 2 at a time). Cook until browned on both sides, about 3-4 minutes each. Transfer to a paper towel-lined plate to drain excess oil. (Fritters can be kept warm in a 200 degree oven if making ahead.)

To make the avocado sauce: blend avocado, yogurt, lemon juice, and salt in a blender or food processor.

Serve fritters warm and garnished with avocado yogurt and scallions.

Follow on Bloglovin

Wednesday, January 29, 2014

kale & chicken quesadillas


Is everyone as obsessed with quesadillas as we are? There's just something about that cheesy goodness in a crisped-up tortilla that makes my heart sing.

These quesadillas are kinda weird and extremely delicious. Make a kale dip, spread it on tortillas, then pile on mozzarella, chicken, and avocado. Just trust me on this one.

This makes a quick, fabulous weeknight dinner, but it would also be a great addition to your Superbowl spread! Dip IN the quesadillas = two birds, one stone.

Kale & Chicken Quesadillas (adapted from Take a Megabite)
makes 2 quesadillas

you'll need:
2 cooked chicken breasts, sliced into strips
1 tablespoon olive oil
3 cups kale, coarsely chopped
2 cloves garlic, minced
3 oz. goat cheese
1/4 cup plain Greek yogurt
4 tablespoons shredded parmesan
1/4 teaspoon red pepper flakes
kosher salt and freshly ground pepper to taste
4 tortillas (I used corn, but use whatever you like!)
1/3 cup shredded mozzarella
1 avocado, halved, pitted, and sliced
sliced green onions and lime wedges, for serving

Heat olive oil in a skillet over medium heat. Add garlic and cook for 30 seconds. Add kale and cook and stir until it's wilted, about 3-4 minutes.

Mix the cooked kale, goat cheese, Greek yogurt, parmesan, red pepper, salt and pepper in a bowl. To assemble quesadillas, divide kale dip, chicken, avocado, and mozzarella between 2 tortillas. Top each one with the remaining tortillas.

Heat a large skillet over medium-high heat. Cook quesadillas on both sides until they are browned and crispy. Serve with scallions and a squeeze of lime.

Follow on Bloglovin

Tuesday, January 21, 2014

sriracha lime salmon


Love her (me!) or hate her, Gwynnie has got to be your BFF when the new year rolls around and you kick it into high clean-eating gear. Gal's got some seriously great recipes (evidence) that are also healthy and simple. What's not to love?

This salmon is too delicious. It's got a perfect balance of flavors and couldn't be easier to throw together. Paired with the best brussels sprouts ever, this is pretty much all I want to eat from now on.

P.S. I've blogged a few recipes from It's All Goodbut that doesn't begin to scratch the surface on how much I've made and LOVED from it. So, I want to give you guys one! I promise you, the recipes in here are awesome and are perfect for starting the new year off right. All you have to do is like Little Kitchie on Facebook, then leave me a comment letting me know you did (or that you already do, which if so, thanks!). You can also follow on Twitter or Pinterest  for extra entries, just comment and let me know. I'll choose a winner at random next Friday, January 31. Good luck! xo


Sriracha Lime Salmon (slightly adapted from It's All Good. Actually the only difference here is not making my own sriracha because sanity.)
serves 2

you'll need:
zest of 1/2 a lime
1 1/2 tablespoons freshly squeezed lime juice
1 1/2 teaspoons sriracha
1 tablespoon maple syrup
kosher salt
2 pieces of salmon (mine were about 6 oz. each)
2 tablespoons chopped cilantro

Preheat oven to 425 degrees F.

Whisk together the lime zest, juice, sriracha, maple syrup, and a pinch of salt. Line a baking sheet with parchment paper or foil, place salmon on top, and pour the mixture over it.

Roast salmon for 12-15 minutes. Serve sprinkled with cilantro. Enjoy!

Follow on Bloglovin

Monday, December 9, 2013

black bean and corn enchilada stack


Happy Monday, y'all! I'm home again today from school (not complaining) because of this crazy, icy weather we've been having. I know that those of you who live up north are probably laughing at us right now, but just remember that here in Texas we get over 50 days of 100+ degree weather every year... so we get a pass when the cold finally hits. :)

As promised, here's another fast, easy supper for you guys. This one is a total no-brainer that I just made up on the fly as I was trying to use up what's left in our pantry and fridge. I knew I'd like it because I love all the ingredients, but it turned out even better than I expected! We absolutely loved this, and it made great leftovers for dinner the next day as well. During this hectic season, doesn't a delicious, no-brainer dinner sound just right?

Black Bean and Corn Enchilada Stack
4-6 servings

you'll need:
2 (15 oz.) cans of black beans, drained and rinsed
1 (15 oz.) can of red enchilada sauce
1 cup frozen corn
4 jalapenos, seeded and diced
1/2 teaspoon kosher salt
1/2 teaspoon chili powder
1/2 teaspoon garlic powder
dash of cayenne pepper
1 cup shredded pepper jack cheese
12 corn tortillas
sliced green onions, for garnish

Preheat oven to 400 degrees F. Spray an 8x8 baking dish with cooking spray.

In a large bowl, combine black beans, 1 cup enchilada sauce, corn, jalapenos, salt, chili powder, garlic powder, cayenne, and 1/2 cup cheese.

Pour a bit of enchilada sauce into the bottom of your baking dish, swirling to coat. Place a layer of 4 corn tortillas on top. Add 1/2 of the black bean and corn mixture on top. Repeat. Add a final layer of tortillas, then top with remaining enchilada sauce and cheese.

Bake for 20-25 minutes, until hot and bubbly. Allow to stand for about 5 minutes before serving. Garnish with green onions if desired.

Follow on Bloglovin

Wednesday, December 4, 2013

crockpot italian beef sandwiches


I've been failing you as a food blogger this holiday season, I know. Posts have been more sparse and lacking any seasonal awareness whatsoever (no cookie or candy recipes yet, and we're already 4 days into December?! sigh...). But, I do have an explanation!

No, I'm not pregnant.

But we are MOVING! (Insert hallelujah chorus here.) After almost 2 years in our teeny tiny, impractical, maddening loft apartment, we are moving into our first home!

All that being said, most of our kitchen is completely packed up, and we are cooking just enough to survive as we prepare for the move. And by cooking I mostly mean transferring food from takeout containers to paper plates.

So until we're in our new place, it'll be slower around here, and mainly focused on simple, easy dinner ideas. You do need to eat dinner in between all that holiday baking, right? So, another slow cooker recipe for y'all today! It's supposed to get reeeeeally cold in Dallas by the end of the week (fingers crossed for a snow day!), so meals like this one are exactly what I'm craving. This couldn't be easier to make, and it is soooooo delicious and flavorful.

Crockpot Italian Beef Sandwiches (from Iowa Girl Eats)
makes 6 sandwiches

you'll need:
3 lb. chuck roast
1 envelope Italian salad dressing mix
1 cup pepperoncini pepper slices + splash of juice (plus extra for serving)
1 cup Chicago-Style Italian sandwich mix (I used this one)
2 cups beef broth
shredded provolone cheese
5 hoagie buns (I used pretzel bread hoagies...amaze)

Place chuck roast into the bottom of a crockpot and sprinkle with salad dressing mix. Add peppers and a splash of their juice, sandwich mix, and beef broth. Cover and cook on low for 9 hours. Shred meat with two forks, then cook on low for 1 more hour.

To serve, split buns, then scoop the shredded meat on top. Top with provolone cheese and extra peppers. And enjoy!
Follow on Bloglovin

Monday, December 2, 2013

pumpkin red curry peanut noodles


Hi friends! Hope you guys all had a wonderful Thanksgiving. Are you still in a food coma, or ready to take on dinner this week? Hopefully the latter, because I have a killer dinner recipe for you guys today!

My love for peanut noodles has been well-documented on this blog. They're fast, fabulous, and totally addicting. This is a great twist on regular peanut noodles, especially for cold fall and winter nights. The red curry adds a little warmth without being overwhelmingly spicy, and the pumpkin makes this dish creamy and rich. Miles and I both loved, loved, loved this - it's definitely going into our regular dinner rotation!

Pumpkin Red Curry Peanut Noodles (adapted from Aida Mollenkamp)
4-6 servings

you'll need:
1 tablespoon olive oil
1 lb. chicken breasts, cut into bite-size pieces
kosher salt and freshly ground black pepper
1/2 lb. fettuccine
1 cup frozen broccoli florets
3 cups baby spinach
2/3 cup pumpkin puree
1/3 cup creamy peanut butter
1/4 cup white wine vinegar
3 tablespoons red curry paste
4 cloves garlic, minced
1 tablespoon honey
1 cup hot water (reserved from pasta water)
6 green onions, thinly sliced
2 tablespoons toasted peanuts, chopped

Heat olive oil in a skillet over medium-high heat. When oil is hot, add chicken to the pan and sprinkle with salt and pepper. Cook until chicken is completely done, then remove to a plate to rest. Lower the heat to medium-low and add the pumpkin puree, peanut butter, vinegar, curry paste, garlic, and honey to the skillet. Whisk until everything is combined and smooth.

Meanwhile, bring a pot of salted water to a boil. Add the pasta and cook according to the package directions. When it's about 2 minutes until pasta is done, add the frozen broccoli to the pot. Place the baby spinach in a colander. Reserve 1 cup of pasta water, then drain the pasta and broccoli on top (so that you pour the water over the pasta and are flash blanching the spinach).

Add reserved pasta water to the pumpkin-peanut butter sauce to thin it out as desired. Add the pasta, broccoli, spinach, and chicken to the skillet toss well, adding more pasta water as necessary. Garnish with green onions and chopped peanuts to serve.

Follow on Bloglovin

Thursday, November 14, 2013

one-pot spicy sausage pasta


Hello dears! How has your week been? I've been all over the map this week, hence the lack of posting. But, I'm back today with a seriously delicious recipe that you will absolutely love. It's spicy, hearty, and cheesy, and - maybe best of all - only dirties one pot! This makes a perfect weeknight dinner, but I'll take it any old night of the week.

One-Pot Spicy Sausage Pasta (adapted from Kevin & Amanda)
serves 4

you'll need:
1 tablespoon olive oil
1 lb. spicy Italian sausage (I used turkey), casings removed
1 cup diced onion
2 cloves garlic, minced
2 cups low-sodium chicken broth
1 (10 oz.) can Ro-Tel tomatoes and green chiles (I used the Hot variety)
1/2 cup heavy cream
8 oz. rigatoni pasta
1/2 teaspoon kosher salt
1/2 teaspoon freshly ground black pepper
1/2 cup pepper jack cheese, shredded
1/3 cup chopped scallions

Preheat the broiler.

Add olive oil to a Dutch oven or large, deep skillet over medium heat. Add sausage and onions and cook until browned and cooked through, breaking up with the back of a fork as it cooks. Add garlic and cook for 1 more minute.

Stir in broth, Ro-Tel, cream, pasta, salt, and pepper. Bring to a boil. Cover and reduce the heat to medium-low. Simmer until pasta is tender, about 15 minutes.

Remove from the heat and stir in 1/2 cup cheese. Top with remaining cheese and sprinkle with scallions. Broil until cheesed is browned and bubbly.

Follow on Bloglovin

Thursday, November 7, 2013

braised greek pot roast linguine


Oh, y'all. This meal. It's my favorite thing to come out of this kitchen in I don't know how long. I know I go on and on all the time on here about food, but every now and then there's a meal that extra special and deserves a serious spotlight... and this is one of them. It's decadent and out-of-this-world delicious. It's special occasion-worthy, but still comforting as can be.

One of the best things about this meal is the hours it just simmers away on your stove... your house will smell INSANE. So, so good. This is the kind of meal that's just meant to be shared with the people you love... and when they taste this, oh how they will love you back.

Braised Greek Pot Roast Linguine (adapted from Heather Christo)
serves 4-6

you'll need:
1 tablespoon unsalted butter
1 tablespoon olive oil
2 1/2 lbs. beef loin tri tip, cut into 4 pieces
salt and pepper
all-purpose flour
4 tablespoons olive oil
1/2 cup chopped onion
4 garlic cloves, minced
1 1/2 teaspoons dried oregano
1 (14 oz.) can crushed tomatoes
1/2 cup red wine
3 tablespoons minced Italian parsley, plus more for serving
1/2 lb. linguine
1 1/2 tablespoons butter
shredded Parmesan, for serving

Melt the butter and 1 tablespoon olive oil in a large heavy pot over medium heat. Rub the meat with salt and pepper generously. Coat lightly with flour and shake off the excess.

Sear the meat on all sides until golden brown (3-4 minutes per side). Once browned, remove from the pot and set aside.

Add 4 tablespoons olive oil and the onions to the pot and cook 4-5 minutes, stirring occasionally. Add the garlic and saute 1 more minute.

Transfer the meat back to the pot and add tomatoes, red wine, and parsley. Cover and simmer on lowest heat for 4 hours, or until the meat is falling apart. Remove from the heat and let sit for 10-15 minutes uncovered. (The fat will come to the surface while the meat is resting; skim and discard.)

While the meat is resting, bring a large pot of water to a boil. Once boiling, add a generous amount of salt and pasta to the water. Cook to al dente according to package directions. Reserve 1/2 cup of pasta water before you drain. Add pasta back into the pot you cooked it in, then add 1 1/2 tablespoons butter and salt and pepper as necessary. Stir to coat.

Serve the braised pot roast and sauce over linguine. Garnish with Parmesan and parsley. Grab a fork and prepare to fall in love!

Follow on Bloglovin

Monday, November 4, 2013

toasted sesame turkey joes with #campbellsauces


Happy Monday, friends! Can y'all believe it's already November? I honestly feel like New Year's was, like, a month ago. But here we are, headed straight into holiday season! November has always been my favorite month - the weather in Texas is fantastic, and it's busy and festive but not too hectic yet. Plus - duh- THANKSGIVING. Favorite holiday, hands down.

But before we get into all things holiday meal, we still need to make dinner! And it should be quick, easy, and healthy! Enter Campbell's Skillet Sauces. Have you guys tried these out yet? They're super flavorful sauces that create an instant meal when you add them to your meat or veggies. So, so simple, and a total lifesaver for a weeknight dinner during this busy time of year.

I used the Toasted Sesame Skillet Sauce to whip up these yummy sammies in about 15 minutes. 15 minutes! The Toasted Sesame sauce gave the turkey a slightly sweet, spicy, nutty goodness that we couldn't get enough of. Fast, simple, delicious - what's better than that?


Toasted Sesame Turkey Joes
yields 4 sandwiches

you'll need:
2 tablespoons olive oil
1/2 yellow onion, chopped
1 lb. ground turkey breast
1/2 teaspoon kosher salt
1/4 teaspoon freshly ground black pepper
1/4 to 1/2 red pepper flakes (depending on how spicy you like it!)
1 (9 oz.) package Campbell's Toasted Sesame Skillet Sauce
4 Pepperidge Farm Sesame Topped Hamburger Buns
coleslaw, for serving (optional)

Heat oil in a large skillet over medium-high heat. Add onion and cook until translucent. Add turkey, salt, pepper, and red pepper flakes. Cook until the turkey is completely done, breaking up with the back of a fork to separate meat.

Stir in Skillet Sauce and simmer until the sauce is absorbed and the mixture is bubbling, 5-7 minutes.

To serve, spoon the mixture onto hamburger buns and top with coleslaw if desired.


This post brought to you by Campbell’s Dinner Sauces. Weekend-worthy dinners with only weekday-level effort needed! Learn more at http://www.campbellsauces.com/.


Wednesday, October 30, 2013

chicken and chorizo mini calzones with creamy avocado dip


These little calzones are absolutely delicious! The chorizo, olives, and sundried tomatoes add huge flavor, and by using frozen dinner rolls and rotisserie chicken, this was the perfect weeknight meal. I love having something to dip calzones into, and this creamy avocado dip fit the bill perfectly. Basically, this is an overall fabulous meal that comes together in no time... and you all know how much I love that!

Chicken and Chorizo Mini Calzones with Avocado Yogurt Dip
yields 16 small calzones

you'll need:
16 frozen, unrisen dinner rolls (thawed and allowed to rise for 2-3 hours)
2 lbs. cooked and shredded chicken thighs (or substitute chicken breasts)
1 tablespoon olive oil
1 onion, chopped
2 garlic cloves, minced
1/4 lb. chorizo sausage
1/4 cup chopped green olives
1/4 cup chopped oil-packed sundried tomatoes
salt and freshly ground black pepper
1 egg, beaten for egg wash

for the avocado dip, you'll need:
1/2 cup plain fat-free Greek yogurt
2 ripe avocados, peeled and seeded
1/2 teaspoon garlic powder
dash of cayenne
2 tablespoons fresh lime juice
salt and pepper to taste

Preheat oven to 400 degrees F.

Heat olive oil in a large skillet over medium heat. Add onion and cook until soft, about 5 minutes. Add garlic and cook for 1 more minute. Add chorizo to the skillet and cook until completely done, breaking up the meat as it cooks. Add green olives, sundried tomatoes, and chicken to the skillet, stirring to combine. Taste for seasoning and add salt and pepper as necessary.

Roll thawed and risen rolls on a lightly floured surface. Spoon a few tablespoons of filling onto half of the dough, then fold it over itself, pressing the edges to seal.

Once all the calzones are assembled, brush each one with egg wash. Bake for 10-12 minutes, until golden.

While calzones are baking, make the avocado dip by combining all of the ingredients into a food processor or blender until smooth.

Serve hot calzones along with a dollop of avocado dip. Enjoy!

Follow on Bloglovin

Related Posts Plugin for WordPress, Blogger...